Lab 2: Securing the Endpoint
© 2023 Amazon Web Services, Inc. or its affiliates. All rights reserved. This work may not be reproduced or redistributed, in whole or in part, without prior written permission from Amazon Web Services, Inc. Commercial copying, lending, or selling is prohibited. All trademarks are the property of their owners.
Note: Do not include any personal, identifying, or confidential information into the lab environment. Information entered may be visible to others.
Corrections, feedback, or other questions? Contact us at AWS Training and Certification.
Overview
You are a security engineer at AnyCompany. You are responsible for the security of all company Amazon Elastic Compute Cloud (Amazon EC2) instances, the data that is stored on the instances (data at rest), and data as it travels between the instances (data in transit).
The application developers at AnyCompany frequently use EC2 instances for frontend web servers and backend database servers. Rather than having to apply security-related adjustments to each new instance as they are deployed, you would like to provide a pre-configured base image for all company instances.
In this lab, you create a custom Amazon Machine Image (AMI) that contains various configuration changes. You then deploy a new instance from the custom AMI and use user data scripts to the instance to add a new user specific to the function of the instance. You then learn how to use AWS Systems Manager to keep your instances patched. Finally, you use Amazon Elastic Block Store (Amazon EBS) encryption to protect company data at rest.
OBJECTIVES
By the end of this lab, you will be able to:
- Create a custom AMI
- Deploy a new EC2 instance from a custom AMI
- Patch an EC2 instance using AWS Systems Manager
- Encrypt an EBS volume
- Understand how EBS encryption works and how it impacts other operations, such as snapshots
TECHNICAL KNOWLEDGE PREREQUISITES
To successfully complete this lab, you should be familiar with basic navigation of the AWS Management Console and be comfortable running commands in a Linux command line interface (CLI).
DURATION
This lab requires approximately 60 minutes to complete.
ICON KEY
Various icons are used throughout this lab to call attention to different types of instructions and notes. The following list explains the purpose for each icon:
- A command that you must run
- A sample output that you can use to verify the output of a command or edited file
- A hint, tip, or important guidance
- Where to find more information
- Information of special interest or importance (not so important to cause problems with the equipment or data if you miss it, but it could result in the need to repeat certain steps)
- A moment to pause to consider how you might apply a concept in your own environment or to initiate a conversation about the topic at hand
- A time when you might need to refresh a web browser page or list to show new information
ENVIRONMENT OVERVIEW
The following diagram shows the basic architecture of the lab environment:
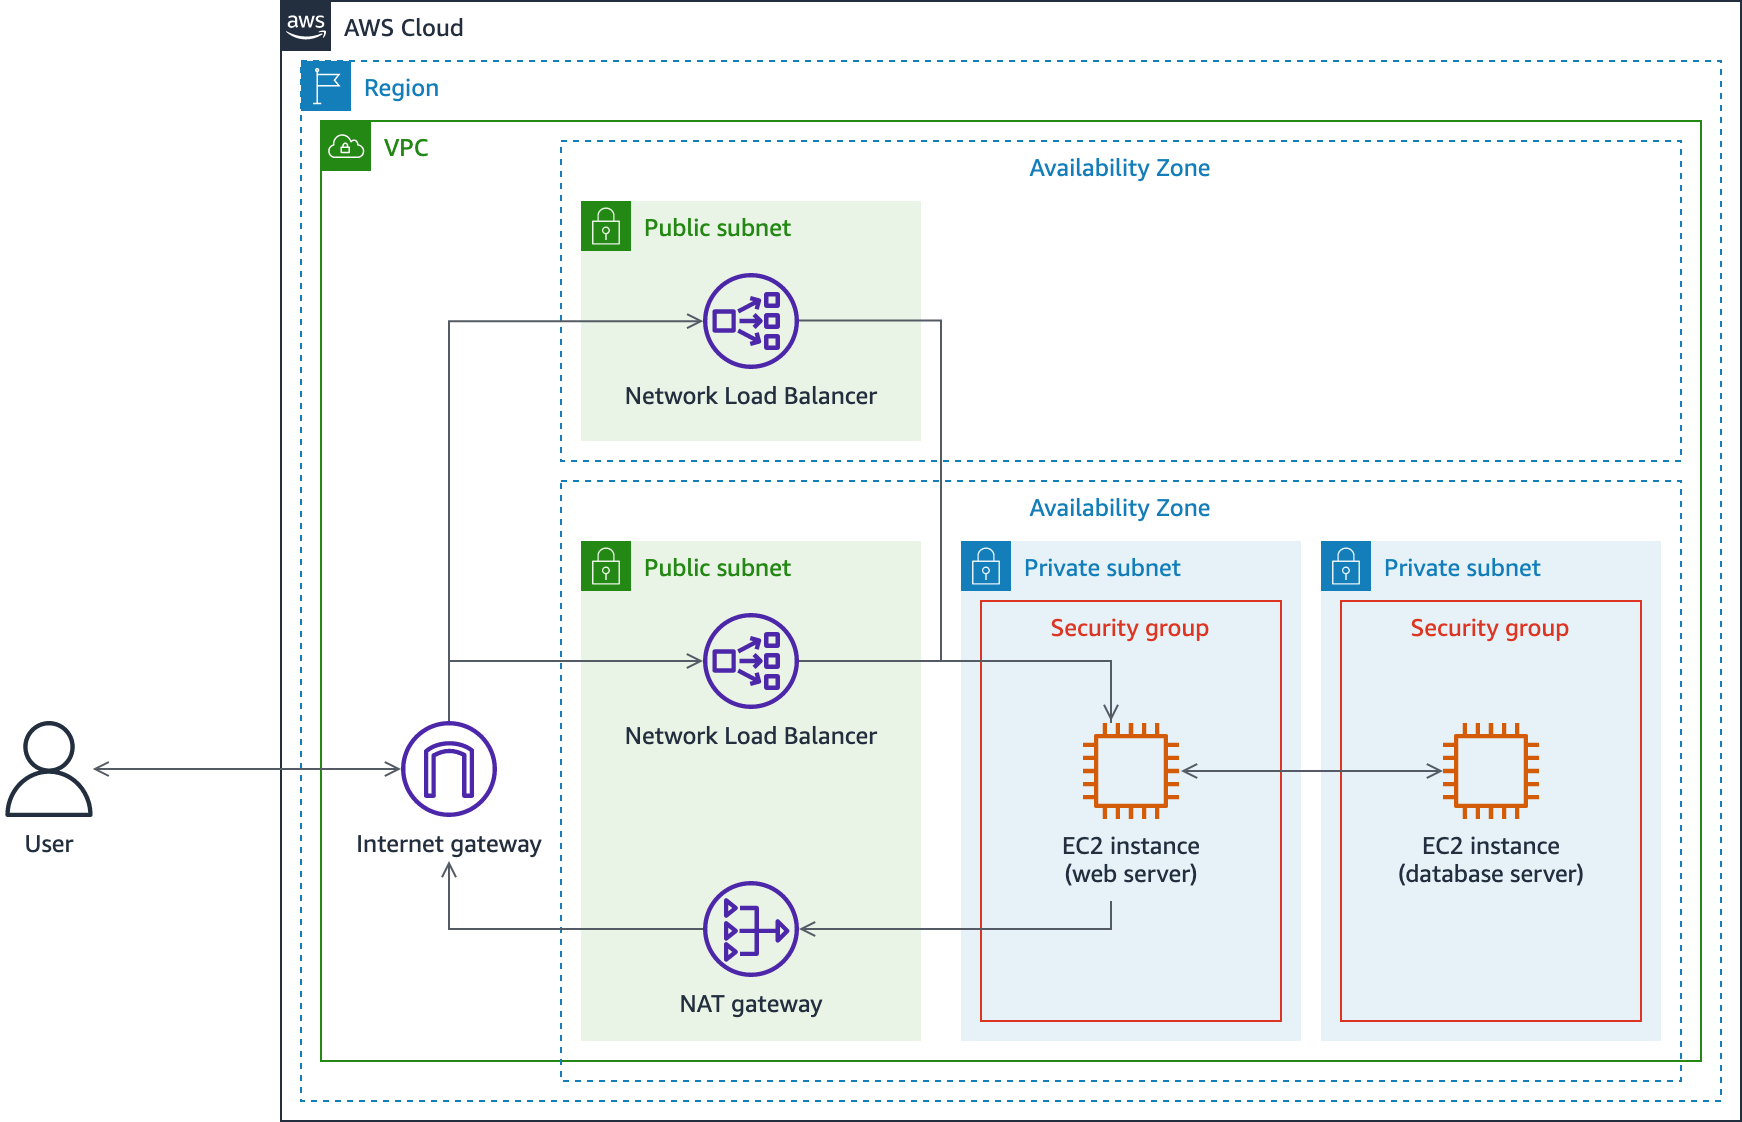
The following list details the major resources in the diagram:
- A VPC with one public subnet and two private subnets in one Availability Zone, and one public subnet in a second Availability Zone.
- A Network Load Balancer with two nodes, one in each public subnet.
- An EC2 instance acting as a web server in the first private subnet.
- An EC2 instance acting as a database server in the second subnet.
- Two security groups, one for each instance based on its purpose.
The network traffic flows from an external user, through an internet gateway to one of the two Network Load Balancer nodes, to the web server. If the URL of the WordPress blog site running on the web server is requested, traffic flows to the database server as well.
Start lab
- To launch the lab, at the top of the page, choose Start lab.
You must wait for the provisioned AWS services to be ready before you can continue.
- To open the lab, choose Open Console.
You are automatically signed in to the AWS Management Console in a new web browser tab.
Do not change the Region unless instructed.
COMMON SIGN-IN ERRORS
Error: You must first sign out
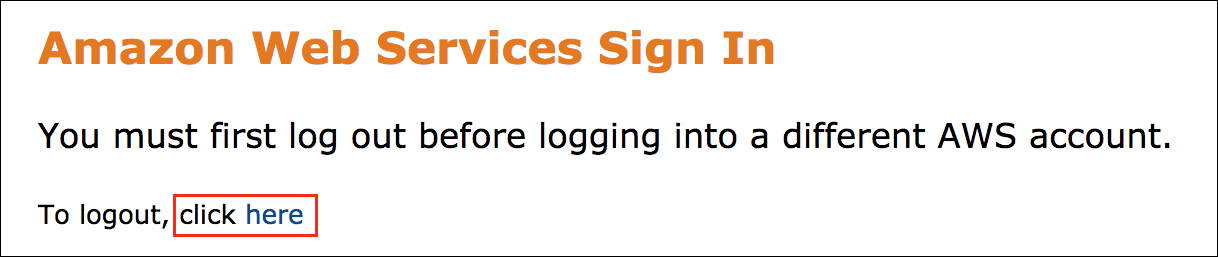
If you see the message, You must first log out before logging into a different AWS account:
- Choose the click here link.
- Close your Amazon Web Services Sign In web browser tab and return to your initial lab page.
- Choose Open Console again.
Error: Choosing Start Lab has no effect
In some cases, certain pop-up or script blocker web browser extensions might prevent the Start Lab button from working as intended. If you experience an issue starting the lab:
- Add the lab domain name to your pop-up or script blocker’s allow list or turn it off.
- Refresh the page and try again.
Task 1: Create a custom AMI from an existing EC2 instance
To comply with AnyCompany security policies, you must ensure certain security settings are applied to all servers. Rather than manually modifying the settings for every new EC2 instance, you’ve decided to apply the settings to one instance and then create a custom Amazon Machine Image (AMI) to deploy future instance from. Following guidance from the Center for Internet Security (CIS) benchmarks for Amazon Linux 2, you have decided to turn off IPv4 ICMP redirects as a test to verify the settings change is captured in the custom AMI.
In this task, you make configuration changes to turn off ICMPv4 redirects on the web server instance and then create a custom AMI of the instance.
TASK 1.1: CONNECT TO THE WEB SERVER INSTANCE
- At the top of the AWS Management Console page, in the unified search bar, search for and choose
If you do not have the AWS Management Console tab open, follow the steps in the Start Lab section to log into the AWS Management Console.
In the navigation pane at the left of the page, under Instances, choose Instances.
Select Web Server and then, at the upper-right of the page, choose Connect.
On the Connect to instance page, choose the Session Manager tab, and then choose Connect.
A new web browser tab opens with a console connection to the instance. A set of commands are run automatically when you connect to the instance that change to the user’s home directory and display the path of the working directory, similar to this:
cd HOME; pwd
sh-4.2$ cd HOME; pwd
/home/ec2-user
sh-4.2$
TASK 1.2 TURN OFF IPV4 ICMP REDIRECTS
First, check the current running state and status of the system configuration files related to the setting.
- Run the following command to check the current running configuration for accepting IPv4 ICMP redirects on existing interfaces:
On a Windows-based computer, you might need to use Ctrl + Shift + V or open the context menu (right-click) to paste text into a Session Manager console window.
sysctl net.ipv4.conf.all.accept_redirectsThe output should show that the setting has a value of 1, which indicates ICMP redirects are allowed, similar to this:
net.ipv4.conf.all.accept_redirects = 1- Run the following command to check the current running configuration for accepting IPv4 ICMP redirects on interfaces that might be newly created in the future:
sysctl net.ipv4.conf.default.accept_redirectsThe output should show that the setting has a value of 1, which indicates ICMP redirects are allowed on any newly created interfaces, similar to this:
net.ipv4.conf.default.accept_redirects = 1- Run the following command to check various system configuration files for the IPv4 ICMP redirects setting for existing interfaces, which is applied when the instance starts or reboots:
grep "net\.ipv4\.conf\.all\.accept_redirects" /etc/sysctl.conf /etc/sysctl.d/*.conf /usr/lib/sysctl.d/*.confThere should be no output, indicating the setting is not configured in the system configuration files that were examined.
- Run the following command to check various system configuration files for the IPv4 ICMP redirects setting for newly created interfaces, which is applied when the instance starts or reboots:
grep "net\.ipv4\.conf\.default\.accept_redirects" /etc/sysctl.conf /etc/sysctl.d/*.conf /usr/lib/sysctl.d/*.confThere should be no output, indicating the setting is not configured in the system configuration files that were examined.
In the next step, you change the running state and system configuration files to turn off IPv4 ICMP redirects now and when the instance is rebooted. An attacker could use falsified ICMP redirects messages to change system routing tables, which in turn could cause the system to send packets to unintended networks and allow system packets to be captured. Turning off ICMP redirects helps to mitigate such an attack on your system.
- Run the following commands to change the current running configuration to turn off IPv4 ICMP redirects for existing and newly created interfaces:
sudo sysctl -w net.ipv4.conf.all.accept_redirects=0
sudo sysctl -w net.ipv4.conf.default.accept_redirects=0
sudo sysctl -w net.ipv4.route.flush=1
The outputs should reflect the change from 1 to 0, similar to this:
sh-4.2$ sudo sysctl -w net.ipv4.conf.all.accept_redirects=0
net.ipv4.conf.all.accept_redirects = 0

sh-4.2$ sudo sysctl -w net.ipv4.conf.default.accept_redirects=0
net.ipv4.conf.default.accept_redirects = 0

sh-4.2$ sudo sysctl -w net.ipv4.route.flush=1
net.ipv4.route.flush = 1- Run the following commands to edit the system configuration files to turn off IPv4 ICMP redirects for existing and newly created interfaces any time the instance is rebooted:
echo "net.ipv4.conf.all.accept_redirects = 0" >> /etc/sysctl.conf
echo "net.ipv4.conf.default.accept_redirects = 0" >> /etc/sysctl.conf
Finally, verify the settings were changed successfully.
- Run the following command to check the current running configuration for accepting IPv4 ICMP redirects on existing interfaces:
sysctl net.ipv4.conf.all.accept_redirectsThe output should show that the setting has a value of 0, which indicates ICMP redirects are not allowed, similar to this:
net.ipv4.conf.all.accept_redirects = 0- Run the following command to check the current running configuration for accepting IPv4 ICMP redirects on interfaces that might be newly created in the future:
sysctl net.ipv4.conf.default.accept_redirectsThe output should show that the setting has a value of 0, which indicates ICMP redirects are not allowed on any newly created interfaces, similar to this:
net.ipv4.conf.default.accept_redirects = 0- Close your AWS Systems Manager – Sessions Manager web browser tab with the console connection to the instance.
TASK 1.3: CREATE A CUSTOM AMI
Now that you have changed a security setting that you would like to apply to all of your web server instances going forward, you can create a custom AMI to make including the changes in new servers easier.
Return to your web browser tab with the EC2 management console.
In the navigation pane at the left of the page, under Instances, choose Instances.
You might need to choose the menu icon at the upper-left corner of the page to open the navigation pane.
Select the Web Server instance.
At the upper-right of the page, choose Actions and then choose Image and templates, Create image.
On the Create image page:
- For Image name, enter
- For Image description, enter
- Keep the defaults for the remaining settings.
By default, Amazon EC2 reboots the instance as part of the process to create an AMI. You can choose the No reboot option, but the file system integrity of the created image cannot be guaranteed. For more information about creating an AMI from an instance, refer to Create an AMI from an Amazon EC2 Instance in the Additional resources section at the end of this lab.
At the lower-right of the page, choose Create image.
In the navigation pane at the left of the page, under Images, choose AMIs.
Locate the AMI you just created. Scroll to the right to locate the Status column. Monitor the status until it changes from Pending to Available.
It can take 2-3 minutes for the AMI to finish creating. You might need to choose the refresh button at the top of the page to update the status.
Congratulations! You have successfully modified security-related settings on an EC2 instance and captured the changes in a custom AMI.
Task 2: Deploy a new EC2 instance from a custom AMI
Now that you have a custom AMI, you can deploy a new EC2 instance from the AMI to verify that the changes persist with new instances.
In this task, you deploy an EC2 instance from the custom AMI you created in the previous task. As you configure the new instance, you use a user data script to create a new user on the instance. Finally, you connect to the instance and verify that the security settings persist with the new instance and that the new user was created successfully.
On the Amazon Machine Images (AMIs) page, select the AMI you created in the previous task.
At the upper-right of the page, choose Launch instance from image.
For Name and tags: enter
.For Instance type, choose t3.micro. The t3.micro instance is the only type allowed in this lab. If you choose a different instance type, you are unable to complete the wizard.
For Key pair, choose proceed without a key pair.
For Network settings, choose Edit. - then configure:
- VPC: Lab VPC.
- Subnet: Web Server Subnet (Private)
- Firewall (security groups): Select existing security group. Then choose WebServerSG.
Expand Advanced details.
For IAM instance profile, choose WebServerProfile.
For this particular instance, you would like to create a new user to test your application with. You can use the User data parameter to run commands as the instance is deployed.
- In the User data section at the bottom of the page, in the User data text box, enter the following command to create a new user:
#!/bin/bash
useradd -m webuser -g users
The command uses the bash shell to specify a new user named webuser, create a home directory for the user, and add it to the users group.
Choose Launch instance.
Choose View all instances.
TASK 2.2: VERIFY THE SETTINGS ON THE NEW INSTANCE
- On the Instances page, select the instance you just created, From Custom AMI.
It can take 2-3 minutes for the new instance to launch. You might need to choose refresh at the top of the page to update the status.
At the upper-right of the page, choose Connect.
On the Connect to instance page, choose the Session Manager tab, and then choose Connect.
A new web browser tab opens with a console connection to the instance.
- Run the following command to check the current running configuration for accepting IPv4 ICMP redirects on existing interfaces:
sysctl net.ipv4.conf.all.accept_redirectsThe output should show that the setting has a value of 0, which indicates ICMP redirects are not allowed, similar to this:
net.ipv4.conf.all.accept_redirects = 0Next, verify that the new user you created with the user data script was created successfully.
- Run the following command to query the list of users on the system for webuser:
getent passwd webuserThe output should show the webuser username, user ID, home directory path, and default shell path, similar to this:
webuser:x:1001:100::/home/webuser:/bin/bash- Close your AWS Systems Manager – Sessions Manager web browser tab with the console connection to the instance.
Congratulations! You have successfully created a new EC2 instance from a custom AMI.
Task 3: Patch instances with AWS Systems Manager Patch Manager
To remain compliant with AnyCompany security policies and standards, you must ensure to install new security patches on all EC2 instances as they are discovered and released.
In this task, you use AWS Systems Manager Patch Manager to create a patch baseline for Amazon Linux 2 instances. You then scan your instances and apply any missing security patches automatically.
TASK 3.1: CREATE A PATCH GROUP
First, create a patch group to target specific EC2 instances. In this scenario, you want to ensure all web and database server instances receive specific patches.
At the top of the page, in the unified search bar, search for and choose
.In the navigation pane at the left of the page, under Node Management, choose Fleet Manager.
On the Fleet Manager page, in the Managed nodes section, select all three nodes.
Choose Node actions and then, under Node settings, choose Add tags.
In the Add tags to selected nodes pop-up window:
- For Key, enter
- For Value, enter
Tag parameter values are case sensitive. For Patch Manager patch groups, the key must be Patch Group. The value parameter can be set to anything that helps you best identify what the patch group is used for. For more information, refer to About patch groups in the Additional resources section at the end of this lab.
- Choose Submit.
TASK 3.2: CONFIGURE PATCHES
Next, create a patch baseline to define the types of patches you want to apply to the instances in the patch group.
- In the navigation pane at the left of the page, under Node Management, choose Patch Manager.
You might need to choose the menu icon at the upper-left corner of the page to open the navigation pane.
On the AWS Systems Manager Patch Manager page, choose Start with an overview.
On the Patch Manager page, choose Patch baselines.
Choose Create patch baseline.
On the Create patch baseline page:
- In the Patch baseline details section, for Name, enter
- For Operating system, select Amazon Linux 2.
- In the Approval rules for operating systems section:
- For Products, verify All is selected.
- For Classification, select Security.
- For Severity, select All.
- For Auto-approval, select Approve patches after a specified number of days.
- For Specify the number of days, keep the default value of
- Keep the remaining default values.
- At the bottom of the page, choose Create patch baseline.
Next, associate the patch group with the patch baseline.
On the Patch Manager page, in the Patch baselines section, search for the baseline you just created,
.Select the AL2_security_patches baseline, choose View details.
In the Tags section, choose Edit tags.
Choose Add tag, then configure:
- Key:
- Value:
- Choose Save changes.
TASK 3.3: REVIEW AVAILABLE PATCHES
In the left navigation pane, choose Patch Manager.
In the main page, choose Start with an overview.
On the Patch Manager page, choose the Patches tab.
In the Patches section, for Operating system, select Amazon Linux 2.
Select a patch of your choosing from the list of patches.
In the Description section at the bottom of the page, review the information about the patch. You should find data such as the Common Vulnerabilities and Exposures (CVE) ID, release date and time, and system architecture.
Notice the patches have a Classification of Security, which are the types of patches you selected for your patch baseline.
TASK 3.4: APPLY PATCHES
Now that you have configured how you would like patches applied you can initiate the patching process.
Choose Patch now.
In the Basic configuration section, choose Configure patching.
In the Instances to patch section, configure:
Ensure Enter instance tags is selected.
Under Instance tags:
- For Tag key, enter
- For Tag value, enter
- For Tag key, enter
- In the Patching schedule section, configure:
- Select Skip scheduling and patch instances now
- In the Patching operation section:
- Ensure Scan and install is selected.
- Choose Configure patching.
You should notice a green banner at the top of the page with a Successfully configured patching message.
TASK 3.5: VERIFY PATCHING COMPLIANCE
Finally, verify that the patches were applied.
- On the Patch Manager page, choose the Dashboard tab.
You see a Compliance summary, showing ‘3’ compliant resources.
- Choose the Compliance reporting tab.
You see more details about the compliance status, including the date and time of the latest patching operation.
Congratulations! You have successfully created a patch baseline to apply security-related patches to all of your instances.
Task 4: Protect data at rest
As you are performing a security audit of the instances in your test environment, you discover that the storage volumes on the instance are not encrypted. Because the instances could contain sensitive data, you want to encrypt the storage volumes.
In this task, you create an encrypted snapshot of the root Amazon Elastic Block Store (Amazon EBS) volume on the web server instance. You then create a new encrypted Amazon EBS volume from the snapshot, and then replace the unencrypted root volume on the instance.
TASK 4.1: CREATE A SNAPSHOT OF THE CURRENT ROOT VOLUME
At the top of the page, in the unified search bar, search for and choose
.In the navigation pane at the left of the page, under Instances choose Instances.
Select the Web Server instance.
In the Availability Zone column to the right of the instance name, make a note of the Availability Zone the instance is running in.
You use the Availability Zone to create a new root volume in a future step.
At the upper-right of the page, choose Instance state and then choose Stop instance.
In the Stop instance pop-up window, choose Stop.
In the details pane at the bottom of the page, choose the Storage tab.
In the Root device details section, make a note of the Root device name, which should be
.
You use the device name in a future step when you replace the root volume.
In the Block devices section, verify there is one volume listed and its Device name is /dev/xvda.
Choose the Volume ID link for the /dev/xvda device to visit the details page for the volume.
The Volumes page should load with a filter applied so only the volume you selected is shown.
On the Volumes page, select the volume.
At the upper-right of the page, choose Actions and then choose Create snapshot.
On the Create snapshot page:
- In the Details section, for Description, enter
- In the Tags section, choose Add tag and then:
- For Key, enter
- For Value, enter
- Choose Create snapshot.
You should notice a green banner at the top of the page with a Successfully created snapshot message.
In the navigation pane at the left of the page, under Elastic Block Store, choose Snapshots.
Select the Web Server Root snapshot you just created.
Wait for the Snapshot status to change to Completed, which takes approximately 1-2 minutes.
You might need to choose the refresh button at the upper-right of the page to update the status.
At the upper-right of the page, choose Actions and then choose Copy snapshot.
On the Copy snapshot page:
- For Description, enter
- For Destination Region, select the region that matches the AwsRegion value listed to the left of these instructions.
- For Encryption, select Encrypt this snapshot.
- For KMS key, select (default) aws/ebs.
At the bottom of the page, choose Copy snapshot.
Wait for the Snapshot status to change to Completed, which should take approximately 3-4 minutes.
TASK 4.2: CREATE A NEW VOLUME FROM THE ENCRYPTED SNAPSHOT
Select the Web Server Root (Encrypted) snapshot you just created.
At the upper-right of the page, choose Actions and then choose Create volume from snapshot.
On the Create volume page, in the Volume settings section, keep the default values except for the following:
- For Availability Zone, select the Availability Zone that the web server instance is running in, which you made a note of previously.
- For Encryption, notice Encrypt this volume is already selected, with no option to deselect it.
- Because you encrypted the snapshot, all volumes created from the snapshot are automatically encrypted using the same key as the snapshot. For more information, refer to How EBS encryption works in the Additional resources section at the end of this lab.
- In the Tags section, choose Add tag. and then:
- For Key, enter
- For Value, enter
- At the bottom of the page, choose Create volume.
You should notice a green banner at the top of the page with a Successfully created volume message.
TASK 4.3: REPLACE THE WEB SERVER ROOT VOLUME
In the navigation pane at the left of the page, under Elastic Block Store, choose Volumes.
On the Volumes page, in the list of volumes, select the WebServerRoot volume.
At the upper-right of the page, choose Actions and then choose Detach volume.
In the Detach pop-up window, choose Detach.
Select the volume you created from the encrypted snapshot. The Name column should show Web Server Root (Encrypted).
At the upper-right of the page, choose Actions and then choose Attach volume.
On the Attach volume page:
- For Instance, select Web Server.
- For Device name, enter the Root device name that you copied previously, which should be
- Choose Attach volume.
TASK 4.4: START THE WEB SERVER INSTANCE WITH THE ENCRYPTED ROOT VOLUME
In the navigation pane at the left of the page, under Instances, choose Instances.
On the Instances page, select the Web Server instance.
At the bottom of the page, in the Details pane, choose the Storage tab.
In the Block devices section, notice the /dev/xvda volume is now encrypted.
If the volume still shows as not encrypted, you might need to refresh the page to update the status.
- At the upper-right of the page, choose Instance state and then choose Start instance.
TASK 4.5: VERIFY THE VOLUME STILL CONTAINS THE ORIGINAL DATA
Wait approximately 1 minute for the Web Server instance to start up and the Status checks to pass.
Copy the TestSiteUrl value from the list to the left of these instructions. Paste the URL into a new web browser tab and press Enter to navigate to an Apache test page on the web server.
On MacOS Catalina and later, some Chromium-based web browsers, such as Google Chrome or Microsoft Edge, might not display a link to continue to the site, with a NET::ERR_CERT_INVALID error message. If you experience this situation, try using an alternative web browser, such as Mozilla Firefox.
Congratulations! You have successfully encrypted a volume on an existing EC2 instance to protect data at rest.
Challenge task
Based on what you learned in Task 4, update the Database Server instance to use an encrypted root volume. To test that the database instance is functioning properly after encrypting the volume, visit the WordPressUrl link listed to the left of these instructions. A WordPress installation configuration page should load.
If you get stuck, refer to the Answer key section at the end of this lab for the solution.
Conclusion
Congratulations! You now have successfully:
- Created a custom AMI
- Deployed a new EC2 instance from a custom AMI
- Patched an EC2 instance using AWS Systems Manager
- Encrypted an EBS volume
- Understood how EBS encryption works and how it impacts other operations, such as snapshots
End lab
Follow these steps to close the console and end your lab.
Return to the AWS Management Console.
At the upper-right corner of the page, choose AWSLabsUser, and then choose Sign out.
Choose End lab and then confirm that you want to end your lab.
Additional resources
- AWS Systems Manager Session Manager
- Create an AMI from an Amazon EC2 Instance
- About patch groups
- AWS Systems Manager documents
- Amazon EBS encryption
- Replace a root volume
- How EBS encryption works
For more information about AWS Training and Certification, see https://aws.amazon.com/training/.
Your feedback is welcome and appreciated.
If you would like to share any feedback, suggestions, or corrections, please provide the details in our AWS Training and Certification Contact Form.
Answer key
CHALLENGE TASK SOLUTION
Part 1: Create a snapshot of the current root volume
At the top of the page, in the unified search bar, search for and choose
.In the navigation pane at the left of the page, under Instances choose Instances.
Select the Database Server instance.
In the Availability Zone column to the right of the instance name, make a note of the Availability Zone the instance is running in.
You use the Availability Zone to create a new root volume in a future step.
At the upper-right of the page, choose Instance state and then choose Stop instance.
In the Stop instance pop-up window, choose Stop.
In the details pane at the bottom of the page, choose the Storage tab.
In the Root device details section, make a note of the Root device name, which should be
.
You use the device name in a future step when you replace the root volume.
In the Block devices section, verify there is one volume listed and its Device name is /dev/xvda.
Choose the Volume ID link for the /dev/xvda device to visit the details page for the volume.
The Volumes page should load with a filter applied so only the volume you selected is shown.
On the Volumes page, select the volume.
At the upper-right of the page, choose Actions and then choose Create snapshot.
On the Create snapshot page:
- In the Details section, for Description, enter
- In the Tags section, choose Add tag and then:
- For Key, enter
- For Value, enter
- Choose Create snapshot.
You should notice a green banner at the top of the page with a Successfully created snapshot message.
In the navigation pane at the left of the page, under Elastic Block Store, choose Snapshots.
Select the Database Server Root snapshot you just created.
Wait for the Snapshot status to change to Completed, which takes approximately 1-2 minutes.
You might need to choose the refresh button at the upper-right of the page to update the status.
At the upper-right of the page, choose Actions and then choose Copy snapshot.
On the Copy snapshot page:
- For Description, enter
- For Destination Region, select the region that matches the AwsRegion value listed to the left of these instructions.
- For Encryption, select Encrypt this snapshot.
- For KMS key, select (default) aws/ebs.
At the bottom of the page, choose Copy snapshot.
Wait for the Snapshot status to change to Completed, which should take approximately 3-4 minutes.
Part 2: Create a new volume from the encrypted snapshot
Select the Database Server Root (Encrypted) snapshot you just created.
At the upper-right of the page, choose Actions and then choose Create volume from snapshot.
On the Create volume page, in the Volume settings section, keep the default values except for the following:
- For Availability Zone, select the Availability Zone that the database server instance is running in, which you made a note of previously.
- For Encryption, notice Encrypt this volume is already selected, with no option to deselect it.
- In the Tags section, choose Add tag. and then:
- For Key, enter
- For Value, enter
- At the bottom of the page, choose Create volume.
You should notice a green banner at the top of the page with a Successfully created volume message.
Part 3: Replace the database server root volume
In the navigation pane at the left of the page, under Elastic Block Store, choose Volumes.
On the Volumes page, in the list of volumes, select the DatabaseServerRoot volume.
At the upper-right of the page, choose Actions and then choose Detach volume.
In the Detach pop-up window, choose Detach.
Select the volume you created from the encrypted snapshot. The Name column should show Database Server Root (Encrypted).
At the upper-right of the page, choose Actions and then choose Attach volume.
On the Attach volume page:
- For Instance, select Database Server.
- For Device name, enter the Root device name that you copied previously, which should be
- Choose Attach volume.
Part 4: Start the database server instance with the encrypted root volume
In the navigation pane at the left of the page, under Instances, choose Instances.
On the Instances page, select the Database Server instance.
At the bottom of the page, in the Details pane, choose the Storage tab.
In the Block devices section, notice the /dev/xvda volume is now encrypted.
At the upper-right of the page, choose Instance state and then choose Start instance.
Part 5: Verify the volume still contains the original data
Wait approximately 1 minute for the Database Server instance to start up.
Copy the WordPressUrl value from the list to the left of these instructions. Paste the URL into a new web browser tab and press Enter to navigate to a WordPress installation configuration page.

